When creating a face morphing or composing a virtual face using Face Mixer, you will find that you only wish to work with the face portion of the images and don't wish to use entire images. Although you can use the built-in crop tool to select the desired face portion of an image, it is not an easy work. Especially after you change the movie size, you have to re-crop all the source images to keep the aspect ratio, otherwise the movie will be distorted.
With the intelligent tool, Face Extractor, the program can automatically extract the face portion from all the source images in the project using an extracting template. This will also ensure that all the face portions are aligned.
1. Before you can use Face Extractor, create a Morph project with two source images or a Multiple Morph project with multiple source images. Especially you should set the desired final movie size before the next steps.
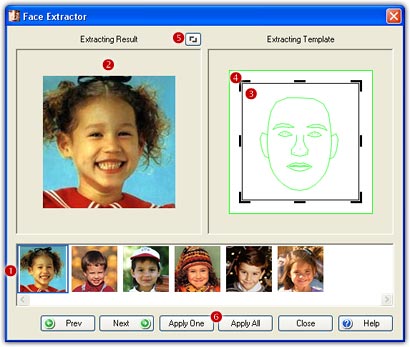
2. Choose the Add-Ins/Face Extractor menu to open the window below.
3. All the source images in current project are listed
here (![]() ).
Click a thumbnail to start to extract the face portion from the source image.
You can also click the Prev/Next
button to load the previous or next source image.
).
Click a thumbnail to start to extract the face portion from the source image.
You can also click the Prev/Next
button to load the previous or next source image.
4. The extracting result will be presented in the left
window (![]() ).
Only the extracted portion will be used for the morph.
).
Only the extracted portion will be used for the morph.
5. By default, Face Extractor will extract the face
portion from an image as close as it can. However, you can freely adjust the
position and size of the face portion relative to the final movie using the
extracting template in the right window. The portion inside the black box
indicates the face portion (![]() ),
and the whole white area inside the green box indicates the final movie (
),
and the whole white area inside the green box indicates the final movie (![]() ).
Hereby you can adjust the position and size of the face portion to create the
extreme close-up, close-up, medium close-up etc. effects.
).
Hereby you can adjust the position and size of the face portion to create the
extreme close-up, close-up, medium close-up etc. effects.
6. Once the extracting template is changed by any following adjustment, a corresponding extracting result will be presented in the left window in real time.
7. Sometimes the extracting result may be incorrect due to
the head position, facial expression, illumination etc. or you want to choose
another face instead of the selected face from the photo, just double-click the
left window or click the Edit
button (![]() ).
On the edit window below, you can select the desired face portion and make it as
close to the face template (displayed with the green lines) as possible.
).
On the edit window below, you can select the desired face portion and make it as
close to the face template (displayed with the green lines) as possible.

8. When all the extracting results are satisfied, click
the
Apply All button (![]() )
to apply the results to the project.
)
to apply the results to the project.
9. When a new source image added to the project, please
launch Face Extractor to preview and adjust the extracting result, you then need
to click the Apply One button (![]() )
to apply the result only to the new source image.
)
to apply the result only to the new source image.
Remarks